How to Export Outlook 365 Mailbox to PST.
If you're looking for a way to export an Office 365 Mailbox to a PST file, in this guide you'll find detailed instructions on how to do it from Outlook desktop app or from Microsoft 365 admin center.
In some cases there may be a need to export your Office 365 mailbox to a PST file (e.g. for backup or other reasons). This can be done, either by using Microsoft Outlook or by using the Content Search and eDiscovery Export Tool in Office 365 Admin center.
In this guide you'll find step-by-step instructions, on how to save all your Office 365 emails to a .pst archive using Microsoft Outlook, and how to export an Office365 mailbox to a pst file, if you're an Office365 Admin.
- Export Office365 mailbox to PST from Office365 Admin Center.
- Export Office365 emails to PST from Microsoft Outlook.
Method 1. Save/Export an Office 365 mailbox to a PST file from Microsoft 365 Admin Center.
If you're an Office365 Administrator, open Microsoft EDGE* and follow the below steps to export a user's mailbox to a PST file from Microsoft 365 Admin center.
* Important: Apply the following steps using the Microsoft EDGE browser, otherwise you may receive the "Request Failed with status Code 500 "s error when exporting the mailbox.
Step 1. Assign eDiscovery Manager Role to your user.
1. Open Microsoft Edge and Login Microsoft Office365 Admin Center.
2. Click Show all on the left, and then click Compliance to navigate at Microsoft Purview compliance portal
3. At the left select Roles & Scopes > Permissions and then on the right under under Microsoft Purview solutions click Roles.*
* Alternately click Microsoft Purview solutions Roles to go straight to this page.
4. Select the eDiscovery Manager and click Edit.
5a. At eDiscovery Manager wizard (Manage eDiscovery Manager page) click Choose Users to choose the user(s) that you want to have access to eDiscovery Manager.*
* Notes:
1. An eDiscovery Manager can only view and edit cases to which has access. If you're the organization's administrator and you want to have access to all features of eDiscovery Manager, do not select your user here and press Next to go to the next screen.
2. The primary difference between an eDiscovery Manager and an eDiscovery Administrator is that an eDiscovery Administrator can access all cases that are listed on the eDiscovery cases page in the compliance portal. An eDiscovery manager can only access the cases they created or cases they are a member of. For more information about making a user an eDiscovery Administrator, see Assign eDiscovery permissions in the compliance portal.
5b. Find and choose your user, or a user that you want to have access to " eDiscovery Manager"* and click Select. Then click Next.
6. At "Manage eDiscovery Administrator" screen: If you're an Office365 Administrator and you want to have access to all eDiscovery Manager cases, click Choose Users, select your user (admin account) and then click Next.
* Note: An eDiscovery Administrator can view and edit all cases regardless of permissions.
7. Finally click Save to apply the change and then click Done to close the wizard.
8. Proceed to next step.
Step 2. Ensure that eDiscovery Managers have the Export permission.
By default eDiscovery Managers have some pre-assigned permissions like Export, Case Management, Communication, etc.
To make sure that eDiscovery Managers, have the permission to export emails:
1. Go to Office365 Admin Center > Security > Permissions and under Email & collaboration roles, click Roles.
* Alternately click Microsoft Email Collaboration Permissions to go directly to this page.
2. Click on e-Discovery Manager and ensure that the Export role is assigned. If not click the Edit role group button and add the Export role.
Step 3. Export Office 365 Mailbox to PST file.
After performing the above steps, you can export a user's mailbox on a PST file by using the steps below:
1. At Microsoft Office365 Admin Center page click Show All > Compliance
2. At Microsoft Purview click Content search on the left and then click New search at the right.
3. Type a name for the search and click Next.
4a. At Locations page, drag the Exchange mailboxes switch to On and then click Choose users, groups, or teams.
4b. Choose which user's mailbox you want to export and click Done.
4c. Uncheck the Add App content for On-Premises Users if you don't want to download the Teams Chat data and click Next.
5. At Search conditions click Next, because since we want to export the entire mailbox data there is no need to specify any conditions.
6. Finally, click Submit.
7. Wait for the search to be created and when it is complete, click the Done button.
8. The search will start to find the data you requested. So, wait until the process is complete (refresh this page occasionally to see if it is complete).
9a. When the search is completed, click on the Search task to export the results.
9b. At the "Export Mailbox" screen, click Actions > Export results.
9c. At Export results settings, select the following options and click Export:*
-
All items, including ones that have unrecognized format, are encrypted, or weren't indexed for other reasons
-
One PST file containing all messages.
* Note: Of course you can select here any options you want. With the above mentioned options you'll save all the email messages in one PST file.
10. When you informed that "A job has been created" click OK. *
* Note: If after clicking the Export button, you receive the error "Request Failed with status Code 500", apply these steps in EDGE browser.
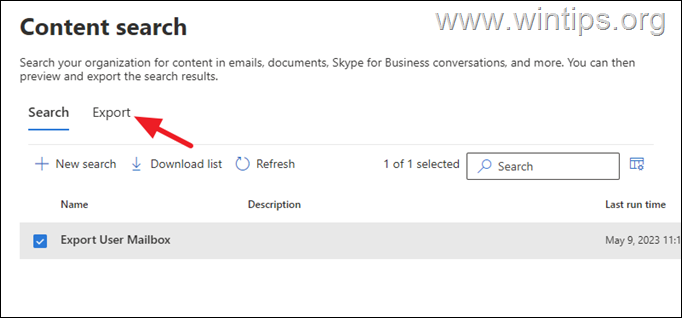
11. Now, at Content search page select the search job and click the Export tab.
12. Now wait until the export is complete and when this done, Copy to clipboard the Export key and then click Download results.
13. At "Open this file" window, click Open.
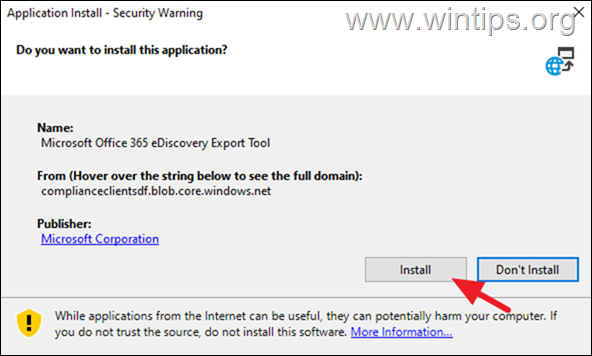
14. If this the first time you exporting a mailbox or other data from Microsoft 365, click Install to install the Microsoft Office 365 eDiscovery Export Tool.
15. At the next window, paste the "Export key" (1), click Browse (2) to choose a location to save the .PST file and expand the Advanced options and give a name for the PST. file (3). When done click Start.
16. Then wait for the eDiscovery Export Tool to download the data you requested.
17. When the operation is completed click Close and you're done!
Additional help:
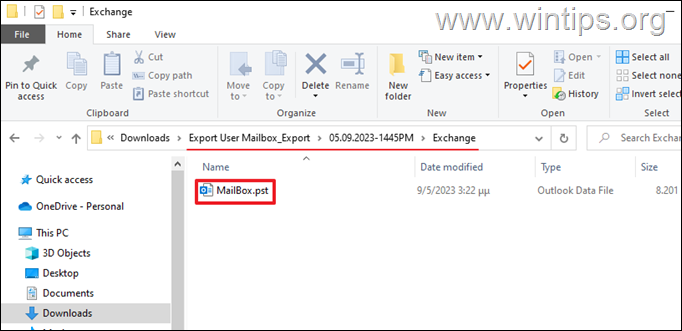
1. To view the exported PST file, go to the location where you selected to save the export and open the "Exchange" folder.
2. If you want to view the contents of the PST file, open Microsoft Outlook and from File menu, choose Open & Export > Open Outlook Data file. Then choose the downloaded PST archive to open it in Outlook.
Method 2. How to Save Office365/Exchange emails to PST from Outlook.
To backup/export your Office365 emails, contacts, and calendar to a PST file in Outlook for desktop app:
1. Open Microsoft Outlook and open the File menu.
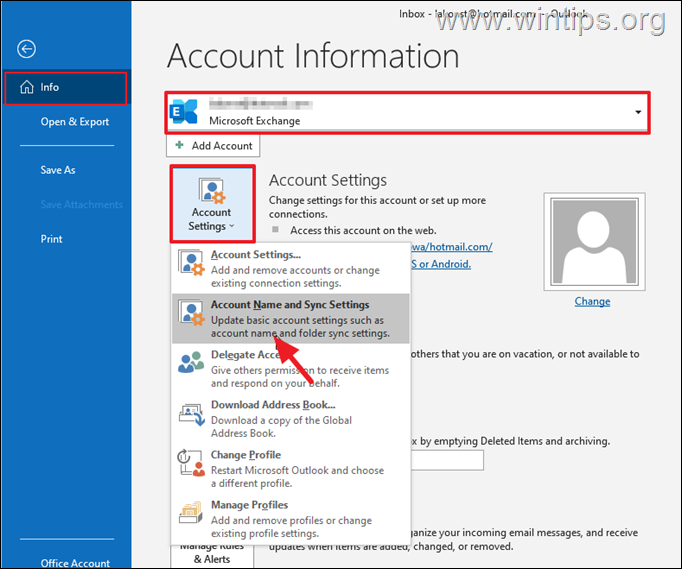
2. At Info tab, choose your Office365 Exchange account and then go to Account Settings > Account Name and Sync Settings
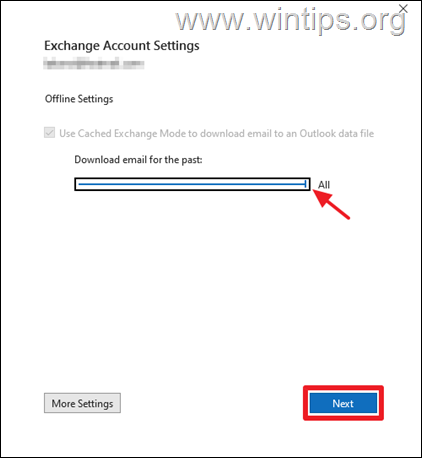
3. Drag the "Download email for the past" slider to All and click Next to download all your Office365 emails locally in Microsoft Outlook.
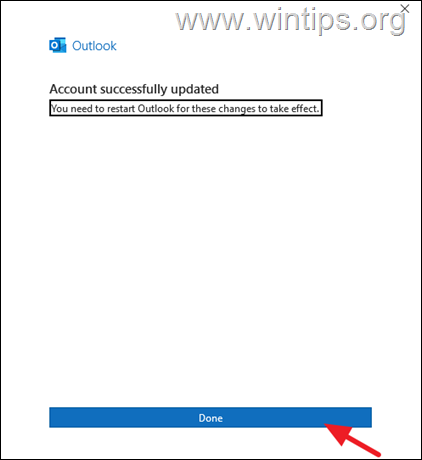
4. Click Done and then close and re-open Microsoft Outlook.
5. After restarting Outlook, wait until all Office 365 emails are synchronized on your computer. *
* Note: To make sure this has been done, check if the oldest emails you see in Office 365 Online Outlook are also seen in Microsoft Outlook on your computer.
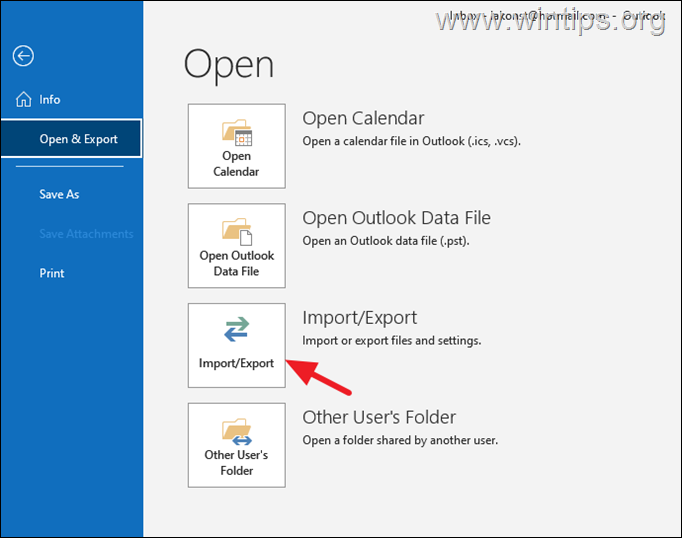
6. To export your Office 365 emails, open again the File menu and choose Open & Export > Import/Export.
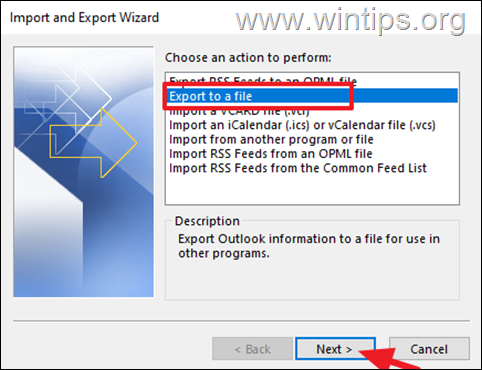
7. At the next window, click Export to a file and click Next.
8. Next select Outlook Data File (.pst) and click Next.
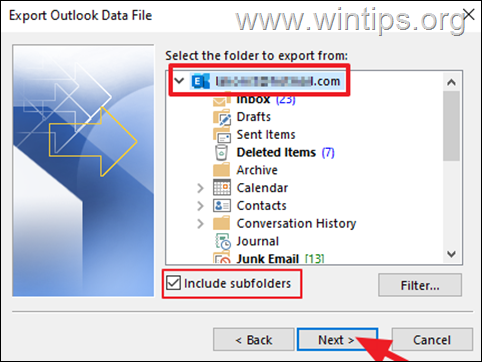
9. At the next screen, select your Office365 mailbox, ensure that "Include subfolders" is checked and click Next.
10. Finally, click the Browse button to select a location to save the exported PST file, type a file name for it and when you are done, click OK and Finish to start the export.
That's it! Which method worked for you?
Let me know if this guide has helped you by leaving your comment about your experience. Please like and share this guide to help others.
We're hiring
We're looking for part-time or full-time technical writers to join our team! It's about a remote position that qualified tech writers from anywhere in the world can apply. Click here for more details.
- How to Easy Update to Windows 11 23H2 on Unsupported Hardware. - November 29, 2023
- How to Record in a PowerPoint presentation Audio & Video. - November 27, 2023
- How to fix: Microsoft Edge won't open, hangs, unresponsive, etc.. - November 22, 2023


